Pages

Sunday 22 December 2013

Driver Genius Professional 14.0.0.323


Driver Genius Professional is a professional Driver management tool features both driver management and hardware diagnostics. driver Genius provides such practical functions as driver backup, restoration, update and removal for computer users. If you often reinstall your operating system, you may not forget such painful experiences of searching all around for all kinds of drivers. If unfortunately you have lost your Driver CD, the search will be more troublesome and time-consuming. Now with the Driver backup function of Driver Genius, you can backup all drivers in your computer before reinstalling, and restore them with the Driver restoration function after system reinstallation has been completed. This will dramatically save your time for Driver installation during the system installation procedure, and you will no longer worry about where to find a Driver. Besides, you can create an automatic installation package for all drivers in your system by Driver Genius.

Change Log 14.0.0.323:
New features:
-Fully support for Windows 8.1 (32bit & 64bit) and Windows Server 2012 R2.
-Enhanced hardware information inventory.
Improvement:
-Expanded driver database includes over 100,000 hardware device drivers.
-Speed up driver update scan by 20%.
-Improved device detection in Windows 8/Windows 8.1 system.
-Driver Download Manager: Improved the large size file download speed.
-Driver Download Manager: Switch to the available mirror server automatically if download fails.
-Added silent install parameter for driver update installation, one click to install drivers.
-Speed up driver Backup speed by 50% in 64 bit system.
-Used LZMA2 compressors to reduce driver file size conspicuously.
Bug Fixed:
-Fixed program may crash on multi-core CPUs with inactive cores system.
-Driver Auto-installer can't be loaded in Dutch language system.
-Backup drivers incompletely in Windows 8/Windows 8.1 system.
-Fixed some bugs in user interface.
-Installation program: Driver database download fails may lead to the program can't be loaded successfully.
-Installation program: The icon displays incorrectly in Start menu.


Friday 20 December 2013

OS X 10.9.1 Mavericks

Apple has released a new build of OS X 10.9 Mavericks. In the latest release includes new core technologies that represent a breakthrough in the field of energy efficiency and responsiveness.OS X Mavericks contains over 200 new features, including Maps, and iBooks, which will now also on a Mac, tags and tabs within the Finder, improved support for working with multiple displays, as well as entirely new version of Safari.

A lot of attention in the OS X Mavericks was given the new technology at the core for maximum energy efficiency, extend battery life on a single charge, and performance.

Starting with Mac OS X 10.0 operating system versions were named after big cats. Starting with this release, Apple decided to call their OS X after the place where the products are developed Apple, California. So the new version of the system called the beach "Mavericks".

New in OS X 10.9 Mavericks:
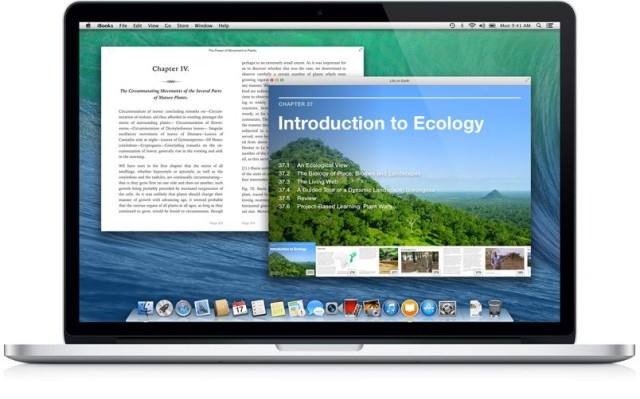
  • OS X Mavericks opens a new chapter in the history of iBooks. Now the books that you have already downloaded to your iPad, iPhone or iPod touch, will automatically appear in iBooks on the Mac.
  • Now on your screen the whole world. Maps application uses each pixel monitor, so you can discover unknown places, and takes full advantage of the graphics system of your Mac. Scaling is incredibly smoothly and quickly.
  • In calendar now updated interface and powerful new features. Continuous scrolling provides a smooth transition between the weeks and months: you can watch the second half of one month and the first half of the next.
  • Safari in OS X Mavericks - it's a great performance and latest technology. Innovative features allow you to easily return to sites you visit often, and to discover new online resources.
  • Sometimes it is very difficult to remember all the necessary passwords. Now, this work takes on iCloud Keychain. This feature stores your logins and passwords for Web sites on your approved devices, protecting them with a strong 256-bit AES encryption and support their relevance to each of the devices.
  • Multiple screens. OS X Mavericks fully engages each monitor connected to your Mac, for more efficient and convenient operation. No longer the primary and secondary monitor - each of them has its own menu bar, and works on any screen in the Dock.
  • Notice. Notifications tell you everything that happens, and now allow to solve various tasks without leaving the application in which you are working. In OS X Mavericks you can interact with the notification - for example, respond to the message, take a video FaceTime or delete email directly from the notification.
  • Tabs Finder. Tabs Finder help you bring order to your desktop by combining multiple Finder windows into one. You can create a tab for documents tab for AirDrop and tab for the function "Access to my computer Mac» - all in one window Finder.
  • Tags - a powerful new way to organize and search for files, including documents stored in iCloud. Tags mark the files you want to group together - for example, "Important." When you need to find these files, simply click the "Important" in the Finder sidebar, or enter this tag in the search box.
  • Advanced technology. High performance and long battery operation - two features of Mac, which is very appreciated by our users. In OS X Mavericks we went even further. We have reviewed all of the levels of the operating system - from the platform to the applications to achieve energy savings while increasing the speed of response. Here are just some of the innovations that optimize the performance of your Mac and increase its efficiency.
  • Timer Coalescing. The challenge is intellectual grouping several small low-level operations for the joint execution. As a result, the processor often occur during periods of inactivity in which it can go into low power mode and save battery power. In some cases, CPU activity is reduced by 72%, which is very important for laptops. While Apple promises that the performance and responsiveness of the system does not affect the technology.
  • App Nap saves energy in the mode with multiple applications. So, OS X detects when the window is completely blocked from view of other windows user. And if such an application window does not perform some work for the user (playing music, downloading files, checking e-mail and so on), then App Nap minimizes resources allocated to the program. When the user returns to this screen OS instantly brings full functionality of the application. The technology works in a similar tabbed Safari, which also only visible on all pages work force. Thanks App Nap CPU usage can be reduced by up to 23%. By the way, in the Safari browser also appeared Technology Power Saver, which analyzes the content displayed on the screen and reduces the load on those elements which are not visible. In addition, resource intensive content like Flash-animation does can stop, so that the user manually runs it.
  • Compressed Memory allows you to increase your computer's speed. When running multiple applications RAM can fill, because of what the system will become noticeably less responsive.Now when filling RAM OS X Mavericks automatically compress inactive data, freeing up significant amounts for current tasks. Once compressed memory elements are needed, OS decompresses them quickly. Because of this, in some cases, the system becomes 1.4-1.5 times more responsive.
  • Safari Power Saver - unbeknownst to you. Battery too. Many websites display animations using energy-intensive plug-ins that may unduly battery power. OS X Mavericks solves this problem.New Safari Power Saver feature detects when you pay attention to the content, and when not.Animation in the center of the page are reproduced as usual. But if they are in the background, Safari Power Saver function suspends them. You will see a still picture and animation will not play until you click on it. Thus, uninteresting content for you will not spend your battery charge.With Safari Power Saver function processor consumes up to 35% less energy when viewing websites with plugins.
  • Compressed memory. Mac becomes much more quickly. Place released. The more memory is available to Mac, the faster it works. But if you have several applications open at the same time, Mac uses more memory. In OS X Mavericks implemented data compression technology in the memory, which releases Mac memory as needed. When Mac finishes available memory, OS X automatically compresses data inactive applications, releasing part of memory.
10.9.1 update includes:
  • Improved support for Gmail in OS X Mail, as well as fixes for users who have made changes to the settings Gmail by default.
  • Improving the reliability of smart boxes and the search function in Mail.
  • Correction of a bug that prevented normal operation in the Mail contact groups.
  • Fix a problem that prevented the utterance in VoiceOver sentences containing Emoji.
  • Periodic updating of general references at the opening in the sidebar Safari.
Installation Procedure:
  • Update. Mount the downloaded image. Rewrite the Install OS X Mavericks.app the Programs folder and run the installer (double click on the file "Install OS X Mavericks")
  • Installation on a separate hard drive. To install OS X 10.9, we need to break the computer drive into several partitions. To rotate it, go to Disk Utility, choose our hard drive, then tab "Section" and add the new one by clicking on the plus. It is recommended to allocate to the Mavericks at least 12 GB, but it is better not to regret, and 15 GB. Mount the image and move the setup application in the directory "Programs" and run it immediately. The setup menu appears in which you are asked to choose what hard drive partition to install OS X 10.9. Push the Mavericks, and then the program will do everything for you. Upon completion of installation, the system will reboot and start using already Mavericks. * How to switch between two installed on your computer operating systems? It is enough to restart the Mac and just before booting the system hold the Option (alt), then you can select your old system.
OS X v10.9 Mac supports the following devices:
  • iMac mid-year 2007 and newer
  • Mac Pro (early 2008 model or newer)
  • Mac mini (early 2009 model or newer)
  • MacBook (aluminum model late 2008, early 2009 model or newer)
  • MacBook Pro (mid-2007 model year and newer (15 and 17 ") or 2009 and newer (13")
  • MacBook Air (late 2008 model or newer)
  • Xserve 2009
System requirements:
  • Intel only (10.6.8 +)
  • 2 GB of RAM
  • 10-12 GB of available disk space


Checksums :
CRC32: 5A8C1494
MD5: 246483AD88E2384EB1A1DA58F9E29EDB

SHA-1: 3934BA21AEC56091595C04E6B1B9599F440CC2AA


ESET Mobile Security for Android, Windows Mobile & Symbian (1 Year) & ESET Smart Security,NOD32 Antivirus,Cyber Security Pro for MAC(100 Days)


Thursday 19 December 2013

The Skype Collaboration Project Special Offer

Offer comprises a twelve (12) month group video calling subscription. Offer must be redeemed on or before 30th April 2014 and commences on the redemption date. Skype account required and subscription may only be redeemed in respect of one Skype account. Skype's Terms of Use apply. To redeem, click here. Group video calling can be between three (3) or more (up to a maximum of ten (10) people). For the best quality, we recommend group video calling between up to five (5) people. You can read full user requirements here. A fair usage policy applies. Terms can change without notice at any time. No cash redemption, except where required by law. Offer subject to availability. Skype reserves the right to withdraw this offer at any time. No emergency calls can be made using Skype. Skype is not a telephone replacement service.


Saturday 14 December 2013

Thursday 7 November 2013

SwiftKey Keyboard v4.3.0.186

SwiftKey 3 understands how words work together, giving much more accurate corrections and predictions than other keyboards. Very sloppy typing will magically make sense, even if you miss spaces, and SwiftKey 3 also predicts your next words.

SwiftKey 3 learns the words and phrases you use, and how you interact with your keyboard as you use it, to make typing easier and even more accurate over time. You can also personalize it using your Gmail, Facebook, Twitter or blog posts.

SwiftKey is among Android's best selling apps for a reason -- it transforms your keyboard, making typing a breeze and saving you hassle every day.


Languages Supported: (enable up to three at once if you're multi-lingual)
  • English (US)
  • English (UK)
  • Afrikaans
  • Arabic
  • Basque
  • Bulgarian
  • Catalan
  • Croatian
  • Czech
  • Danish
  • Dutch
  • Estonian
  • French (CA)
  • French (FR)
  • Finnish
  • Galician
  • German
  • Greek
  • Hebrew
  • Hungarian
  • Icelandic
  • Indonesian
  • Italian
  • Kazakh
  • Korean
  • Latvian
  • Lithuanian
  • Norwegian
  • Persian (Farsi)
  • Polish
  • Portuguese (BR)
  • Portuguese (PT)
  • Romanian
  • Russian
  • Serbian
  • Spanish (ES)
  • Spanish (US)
  • Slovak
  • Slovenian
  • Swedish
  • Turkish
  • Ukrainian
Support for QWERTY, QWERTZ, QZERTY, AZERTY, DVORAK, COLEMAK, Arabic, Bulgarian, Greek, Hebrew, Korean, Persian (Farsi), Russian and Ukrainian layouts.

What's in this version : (Updated : Nov 6, 2013)
  • Multiple layouts for easy typing on all screen sizes
  • Innovative keyboard layouts and modes for a better experience for all users across all screen sizes
  • Full keyboard including Extended layout for tablets, Thumb keyboard for two-handed typing and Compact layouts for one-handed use
  • All three layouts can be resized and undocked so you can choose their position on the screen
  • Canadian English language model
Required Android O/S : 2.1+
http://adf.ly/YxGFx

Tuesday 5 November 2013

Webroot Secure Anywhere for 6 months

-Detects and blocks known and unknown viruses and threats
-"Ridiculously fast scans" keep you protected without interruptions or slowdowns
-Real-time anti-phishing blocks fake websites that trick you into entering personal information and threat shields warn you of potentially infected websites before you visit.
-Create the last password you will ever need - Password Manager protects your logins and simplifies your life using just one master password to securely access all your favorite websites
-Mobile security ensures you're protected from malicious apps and syncs online passwords across all your devices so they are accessible anywhere


Duplicate File Finder Plus


Duplicate File Finder Plus - Quickly finds the duplicate files on your drives relied on file content, and you can remove the unwanted files, so as to recover your valuable disk space, reduce the management costs and avoid the unnecessary confusion.
Features:
100% accurately finds out the complete duplicate files;
Works very fast because of our high-speed file comparison algorithm is built-in;
Compares files based on file content, not file name, last modified date or file size;
Very easy to use, only need 1 click to get the result.


PDFZilla

PDF Conversion Formats Supported
Output - PDF To:
MS Word(*.DOC), MS Excel(*.XLS), Plain Text(*.txt), Rich Text(*.RTF), JPEG(*.JPG), GIF(*.GIF), PNG(*.PNG), TIFF(*.TIF), Bitmap(*.BMP), Flash(*.SWF), Webpage(*.HTML). 

Create - Image To PDF:
JPEG(*.JPG), GIF(*.GIF), PNG(*.PNG), TIFF(*.TIF), Bitmap(*.BMP), Photoshop(*.PSD), Icon(*.ico), PPM(*.PPM), TGA(*.tga). 
Powerful PDF To Word Converter - PDFZilla
Editable - Edit Your PDF Documents In MS Word!
Easily - Convert PDF To Word Document Just In Only 3 Clicks.
High Quality - Convert PDF To Word with ALL text and Graphical Data.
Page Selection - Convert Selected Pages of PDF File To Word document.
Over 20 Languages Supported - Besides English, PDFZilla Also supports German, French, Spanish, Italian and all Unicode Language PDF Files.
Batch Mode - Convert 1,000+ PDF Files in Bulk.

PDFZilla Key Features: 

Convert PDF to Word
Convert PDF to Word with all text and Graphical data. 
Convert PDF to Excel
Convert PDF to MS Excel format so that you can edit and extract PDF forms. 
Convert PDF to RTF
Convert PDF to Rich Text Files. You can edit all text and graphic by Windows Wordpad. 
Convert PDF to TXT
Convert PDF to plain text files. You can edit text by Notepad. 
Convert PDF to Images
Convert PDF to BMP, JPG, GIF or TIF files. 
Convert PDF to HTML
Convert PDF to HTML files and automatically generate the Index file. 
Convert PDF to SWF
Convert PDF to Shockwave Flash Animation files which can be published on websites. 
Convert JPG to PDF
Create a PDF file from images like JPG/PNG/TIF/BMP/GIF etc.
Rotate, Merge and Cut PDF Files
You can rotate PDF files 90 & 180 degrees, or merge several PDF files into one, or delete and cut pdf pages.
Page Selection
Convert all the pages, or partial pages of PDF file. 
Easy to use software
Add a PDF File -> Select the Output File Format -> Click on Start Converting button, then just have a cup of coffee


Monday 4 November 2013

Kaspersky Tablet Security 9.14.21


Protect your smartphone like the mini-PC that it is. Kaspersky Mobile Security delivers real-time protection from viruses, spam, malicious programs, and unwanted calls and SMS texts, plus an instant, cloud-based scanning of downloaded apps. Our unique privacy mode allows you to control access to your contacts and communications. And, advanced anti-theft protection remotely disables, cleans, and finds your missing phone via Google Maps – even if your SIM card has been replaced.

Requirements: Android 2.2 and up

Anti-Theft Protection: Block, clean or find your missing phone even if your SIM card has been replaced

Anti-Virus Protection:
• The latest technologies prevent viruses and spam from infecting your phone while you’re surfing the Internet
• Automatic, cloud-based scanning of downloaded apps
• On-demand and scheduled scans allow you to set up antivirus scanning when it’s most convenient for you

Call & SMS Filter: Blocks unwanted calls and SMS texts

Privacy Protection:
• Control what others can see and access when they pick up your phone
• Keep designated incoming calls and SMS texts completely hidden until you’re ready to view them
• Activate “Private” mode manually, automatically, or remotely

Supported Languages:
Danish, Dutch, English, Finnish, French, German, Italian, Korean, Norwegian, Polish, Portuguese (Brazil), Russian, Spanish, Swedish.


Friday 1 November 2013

Google Earth 7.1.2.2041


Google Earth combines satellite imagery, maps and the power of Google Search to put the world’s geographic information at your fingertips. Fly from space to your neighborhood. Type in an address and zoom right in. Search for schools, parks, restaurants, and hotels. Get driving directions. Tilt and rotate the view to see 3D terrain and buildings. Save and share your searches and favorites. Even add your own annotations. Google Earth lets you do smooth sailing flybyes of the entire Earth. You can easily fly to any spot on the globe, by entering any associated data, like street addresses, place names or lat/long coordinates. There are overlays that put additional information on the map, like roads, international boundaries, terrain, 3D buildings, crime statistics, schools, stadiums, any number of interesting stuff. 


http://anonymz.com/?http://dl.google.com/earth/client/advanced/current/GoogleEarthWin.exe

Monday 28 October 2013

Five Great Tips And Tricks For OS X Mavericks Beta

ibooks_multiple
We’re still finding some great new features and tricks in OS X Mavericks beta, and while it’s not a huge overhaul like the more populare iOS 7 update, Mavericks has plenty of great things going on under the hood. And some of it even on top of the hood.
Here are five more interesting tips and tricks about the latest iteration of Apple’s Mac operating system, OS X Mavericks beta.

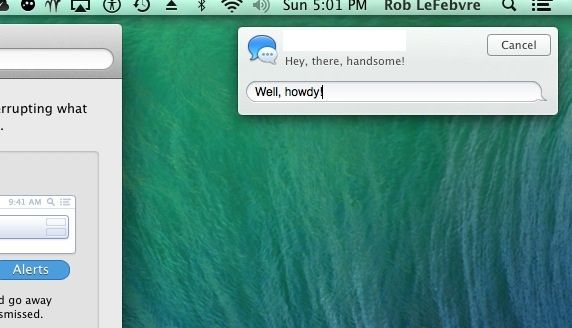
Reply To Text And iMessages From Notification Center

Reply To iMessages
Of course you know already that you can send iMessages to your iOS or OS X using friends and family via the Notification Center.
Did you know, however, that you can reply to iMessages sent to you in that very same Notification Center? If not, read on and learn how to do so, and how to make sure that your Mac is set up correctly to allow it to happen.
You’ll need to have your Messages app set up to get those iMessages in your Notification Center in the first place, so launch System Preferences from the dock or your Application folder, and then click on the Notification Center icon to go to that preference pane.
Once, there, click on Messages in the list of apps in the left-hand column, and make sure the checkbox is enabled for Show in Notification Center. You can choose to have either Alerts or Banners enabled, as they’ll both work for Replies.
Now, when you get an iMessage from someone, you’ll be able to reply to them from the notification. If you have them set up to come in as a Banner, you’ll need to hover over the banner itself to see the Reply button. If you’ve chosen to have Alerts, then you’ll see the Reply button underneath the Close button. Either way, hit the Reply button and type in your response. Your iMessage will go right back to the person who sent you the message in the first place.

Get Rid Of The Dashboard

Dashboard OS X Mavericks
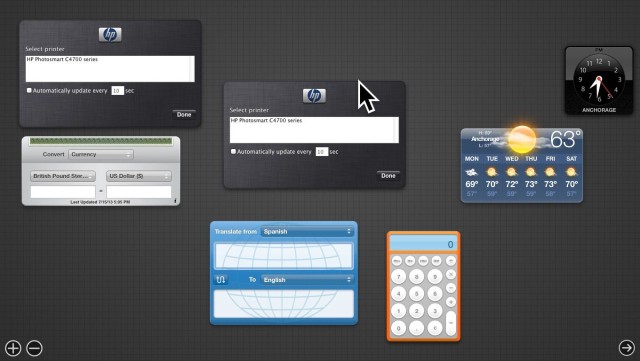
The Dashboard has been getting less and less attention lately, and so it’s surprising that it’s still in OS X Mavericks beta, to be honest.
It does have a nicer background, to be sure, but if you’re feeling like it has outlived its purpose on your Mac, here’s how to get rid of it.
Launch Terminal from your Utilities folder, which is itself in the Applications Folder. Once launched, type or paste the following commands into the Terminal window.
defaults write com.apple.dashboard mcx-disabled -boolean true
Then remember to relaunch the Dashboard process, here:
killall Dock
Now the Dashboard will be gone, baby, gone, and you never have to think about widgets again.
If, however, you want to bring it back? Simple re-do the same commands above, only change the word true to false, and you’ll have it back in your heart lickety-split.
Via: iFans

Skip The Shell Script, Schedule Do Not Disturb Times

Schedule Do Not Disturb
Back in OS X Mountain Lion, it took a seriously complex shell script and recurring Calendar event to schedule Do Not Disturb times. While it’s fun to dig in and mess about with scripts, I much rather like the new Mavericks beta ability to just, you know, schedule Do Not Disturb using a nice, pretty graphical user interface.
If you’re like me, and you want to schedule your Do Not Disturb times on your Mac (much the same way you can on iOS), then here’s what to do.
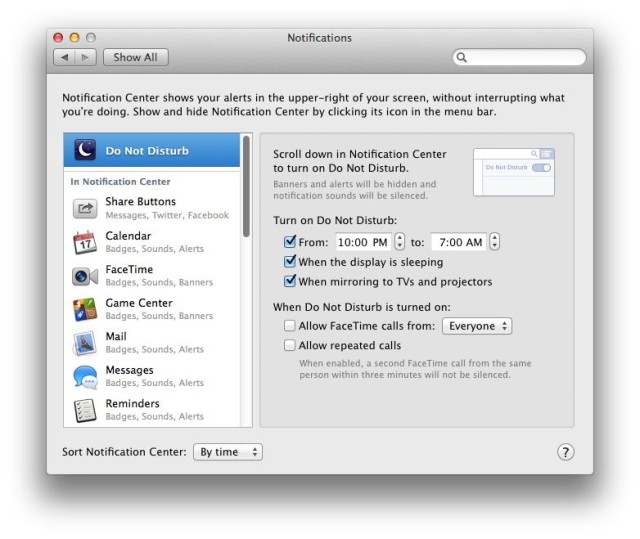
Launch System Preferences from the Dock or the Applications folder, and then click on the Notifications icon. Click on the Do Not Disturb icon in the left-hand column, and then you’ll see the options for this, including scheduling.
Click on the checkbox next to the From: field and either type in the time you want the Do Not Disturb feature to start. Then do the same in the to: field, only choose the time you want Do Not Disturb to stop working.
You can also choose to activate Do Not Disturb when the display is sleeping, or when mirroring to TVs and projectors, to keep any embarrassing iMessages from popping up during a presentation in front of hundreds of your co-workers.
Further down, you’ll see options to allow Facetime calls when Do Not Disturb is enabled, and you can allow them from Everyone, or just Favorite contacts. If you check the “Allow repeated calls” checkbox, then anyone who needs to Facetime you in an emergency simply needs to call back a second time.
Now you can keep from being distracted by the many notifications you get through Notification Center, and you don’t have to get all tech-geeky to do so. Hooray, OS X Mavericks!

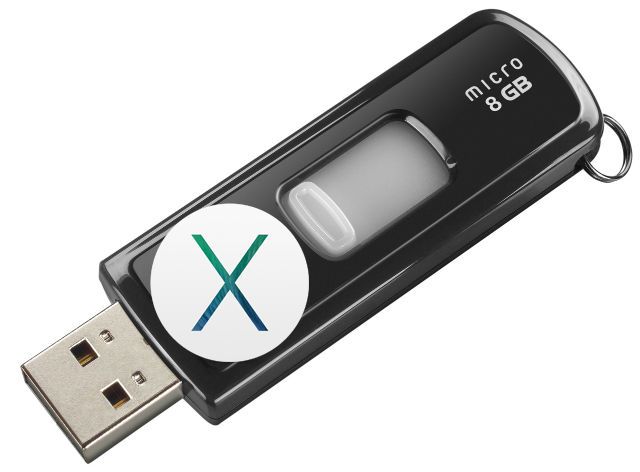
Boot Your Mac Into Mavericks Beta From A USB Drive

USB Mavericks
Are you a registered developer with Apple? Do you want to try out Mavericks without risking your entire Mac to a potentially wonky version of OS X? I haven’t seen any major issues, yet, but that doesn’t mean that mission critical softaware you rely on will work in Mavericks beta.
So, here’s the solution. Boot up from a USB stick that has been configured as a bootable OS X Mavericks drive. Here’s how.
The super smart folks at OS X Daily lay it all out, nice and simple. I’m using their stellar guide to inform this post, as there’s no reason to re-invent the wheel. Go give them a look; they’ve got some great stuff over there.
That said, let’s start in with getting Mavericks beta onto a USB drive. You’ll need at least an 8 G USB stick, or any other external hard drive that you can completely erase and use for this purpose. Also, make sure the Mac you’re using is new enough to run Mavericks beta, too. There’s a list on the Apple.com if you’re unsure.
Head over to the Apple Developer site, sign in with your Apple ID, and download a copy of OS X Mavericks beta. Don’t install it, though.
Connect your USB drive and then launch Disk Utility from the Utilities folder, which is in the Applications folder. Click on the USB drive on the left there, and click on the Partition tab. Select a single partition, and click the options menu to choose “GUID” as the partition type. Hit OK, and then click the Apply button.
Now, in order to see hidden files, issue the following command in Terminal, which you can launch from the Utilities folder, as well:
defaults write com.apple.Finder AppleShowAllFiles TRUE;\killall Finder;\say Files Revealed
Now you’ll want to find the OS X 10.9 Developer Preview app. It should be in the Applications folder. Right click (or Control-Click for you single-button mouse and trackpad users) and choose Show Package Contents from the resulting contextual menu. Open Contents, and then the SharedSupport folder.
You should see a self-mounting image called InstallESD.dmg; double click it to mount it like a regular disk. Open the now mounted disk (OS X Install ESD) image and right-click on BaseSystem.dmg. Choose Open to mount the image. If you don’t see it, you missed the step above to make hidden files visible.
Now drop back into Disk Utility and select BaseSystem.dmg from the left side, and click on the Restore tab. Set Source to BaseSystem.dmg, Destination to the USB drive (you can drag the USB drive icon into the box from the Finder, and then click the Restore button. Be sure to let it erase the drive with a quick confirmation button click.
WHen that process is done, head to the Finder and go to the newly made USB drive, and open System folder, then the Installation folder. Delete the file named Packages, and then leave the Finder window open.
Head back into the mounted OS X Install ESD drive and drag and drop the Packages folder from this disk to the Installation folder you just deleted the Packages alias from. Let stuff copy; it might take a few minutes.
Now the USB drive is ready to boot with. All you need to do is restart your Mac while holding the Option key down. When the list of available bootable drives appear, you should see your USB drive as an orange disk drive named OS X Base System 1. Click on it, and let it install from there.

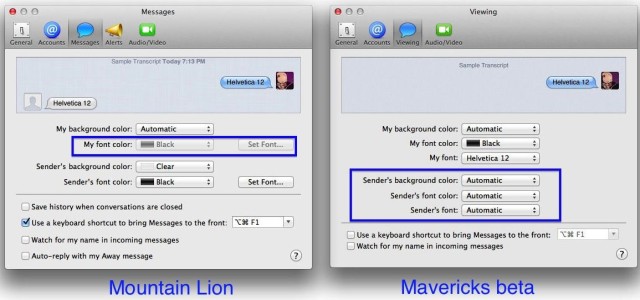
Set Default Font Choices For Messages You Send And Receive

Message Font Choices
In the OS X 10.8 version of Messages on the Mac, you can set the background color of your own messages, and you can set the background color, font, and font color of anyone who sends you messages.
Now, though, in OS X Mavericks, you can do all those things, plus send messages in your own choice of font, as well as let your friends send you messages with their own font choices.
Here’s how to make that happen.
Launch Messages on the Mac you’re running OS X Mavericks beta on, and hit Command-Comma, or choose Preferences… from the Messages menu. Click on the Viewing tab at the top, or what used to be the Messages tab. The options in the View section look fairly similar, with a couple of subtle differences.
First, notice that you can now set your own font. Click on the My font popup menu and choose one of the three options there, or click on Other… to get the full font window.
Just below that, you’ll see the section for your friends’ font and message options. To see messages sent to you in the font, font color, and background color the sender intends, set the popup menu next to each option to Automatic. Now you’ll see what they mean you to see, though it’ll probably still be the default. Because who messes with these things, anyway, right? If you end up hating their font choices, then set them to something different here in these menus. Nice!
Pro tip – if you copy text from a document that has a specific font and style attached to it, pasting your text into Messages will now keep those format choices and send them along.

ImgBurn 2.5.8.0

Description:
ImgBurn is a lightweight CD / DVD / HD DVD / Blu-ray burning application that everyone should have in their toolkit!ImgBurn supports a wide range of image file formats – including BIN, CUE, DI, DVD, GI, IMG, ISO, MDS, NRG and PDI.It supports Unicode folder/file names, so you shouldn’t run in to any problems if you’re using an international character set.It’s a very flexible application with several advanced features that are often lacking in other tools, especially when it comes to burning DVD Video discs. It supports all the latest drives without the need for updates (including booktype / bitsetting / advanced settings on many of the major ones – i.e. BenQ, LiteOn, LG, NEC, Plextor, Samsung, Sony). There is an image queue system for when you’re burning several images (which you can automatically share between multiple drives if you have more than one) and an easy-to-use layer break selection screen for double layer DVD Video jobs.


Change log:
  • Added: Holding the ALT key when clicking on DLE window's Disc pane column header will now remove the sort order (so they're then essentially sorted by addition order).
  • Added: Ability to incrementally search the Explorer pane in the 'Disc Layout Editor' window.
  • Added: The effective USB connection speed (1.1, 2.0, 3.0) for USB devices to the initial device scan log entries.
  • Added: Log entry when burning showing the effective layer break position.
  • Added: Log entry when burning that shows the number of discs a Lite-On drive thinks it has burnt.
  • Added: Pioneer drives now list their 'Kernel Version' next to the firmware version.
  • Added: The Windows 7+ taskbar button/progress display now turns red if an I/O error box pops up during a read/write (etc.) operation.
  • Added: The ability to set the 'Platform ID' when building a bootable disc - thus enabling the creation of UEFI bootable discs.
  • Added: Internal version of the 'BurnerMax Payload' code (well, what I could figure out) to allow for overburning DVD+R DL on many MediaTek chipset based drives. In practice, this only seems to work on Lite-On (and clone) drives that have 'Force HyperTuning' enabled.
  • Added: MSF info to the 'Sector Viewer' tool.
  • Added: Allow for larger I/O buffer (1GB).
  • Added: Option to pick the transfer size (32KB -> 512 KB) used when reading / writing files.
  • Added: Option to enable/disable the OS's buffering when writing image files.
  • Added: Ability to make the Explorer pane in the DLE window 'Read Only'.
  • Added: Support for Opus audio compression format.
  • Added: Support for TAK lossless audio compression format (including embedded CUE sheets).
  • Added: Ability to use a '*' wildcard for 'backup list' directory entries in an IBB project file (applies to Advanced input mode).
  • Added: A few keyboard shortcuts to the DLE window. (Ctrl+Shift+C = New Disc (Clear), Ctrl+Shift+D = Add Folder (Directory), Ctrl+Shift+F = Add Files, Ctrl+Shift+N = New Folder)
  • Changed: No longer bundling/offering the Ask.com toolbar in the setup program, OpenCandy now handles product offerings during installation.
  • Changed: Buffered I/O is now enabled by default for reading/writing files.
  • Changed: Update the splashscreen logo.
  • Changed: The 'Delete' option/button in the Disc Layout Editor has been renamed to 'Remove' so it matches the one in Standard input mode (and so people aren't put off by the term 'Delete' - thinking it'll actually delete the file on their hard drive).
  • Changed/Fixed: Detect oversized UDF File Entry descriptors and don't attempt to parse them.
  • Changed/Fixed: Restore 'Disc Layout Editor' window's focus when the application becomes active.
  • Changed/Fixed: Workaround for the new 16x LG Blu-ray writers that report the wrong (a truncated) current write speed value in the 'GET PERFORMANCE' response when burning at 16x.
  • Changed/Fixed: Workaround for newer LG drives with the 'Silent Play' feature that seem to ignore attempts to set the read speed via the 'SET STREAMING' command. They get fixed on 1x and won't read any faster!
  • Changed/Fixed: Attempt to block users from trying to write discs their 'combo' drive doesn't support (i.e. a DVD+RW/BD-ROM combo drive trying to burn BD-R).
  • Changed/Fixed: Potential errors were being ignored/lost when setting a 'changeable' layer break position to its current/maximum value. The program now reports them.
  • Changed/Fixed: Tweaked the 'browse for folder/file' dialog code to hopefully stop the OS from throwing up a 'There is no disk in the drive. Please insert a disk into drive X:.' error when the MRU location is a drive that no longer has a disc in it.
  • Changed/Fixed: Reworked some commands that could optionally not use 'Immediate I/O'. Old code could fall back to 'Non-Immediate I/O' and loose the initial error message from the 'Immediate I/O' version of the command.
  • Changed/Fixed: Made an adjustment (potential bug fix) to my drag+drop component's code. It may cut down on crashes / weird things happening as a result of the user having performed a d+d operation.
  • Changed/Fixed: 'Shutdown Computer' checkboxes should have read 'Shut Down Computer'.
  • Changed/Fixed: Recently added 'MID' info to was missing from the disc info text in Read / Verify modes.
  • Fixed: Cosmetic issue displaying numbers when the user's 'thousands separator' is set to nothing.
  • Fixed: Displaying wrong firmware subversion on newer LG Blu-ray drives (BH14+).
  • Fixed: Memory leak when burning Audio CDs that use DirectShow for decoding.
  • Fixed: Memory leak when burning an Audio CDs where the files are already in the correct format for burning (no decode required).
  • Fixed: Potential access violation when reading a field in a UDF 'File Set Descriptor'.
  • Fixed: Old (orphaned) AWS related registry/ini file entries were being left behind - this was perfectly fine, it's just nice to keep the place tidy!
  • Fixed: DLE Window's Disc Toolbar wasn't being resized for higher DPI systems - meaning the buttons weren't fully visible.
  • Fixed: When outputting Mode2/Form1/2352 from Build mode, the program didn't take into account any additional data type conversion required for the drive - this could produce a corrupt disc.


  • Disqus

    Please Comment Here