We’re still finding some great new features and tricks in OS X Mavericks beta, and while it’s not a huge overhaul like the more populare iOS 7 update, Mavericks has plenty of great things going on under the hood. And some of it even on top of the hood.
Here are five more interesting tips and tricks about the latest iteration of Apple’s Mac operating system, OS X Mavericks beta.
Reply To Text And iMessages From Notification Center
Of course you know already that you can send iMessages to your iOS or OS X using friends and family via the Notification Center.
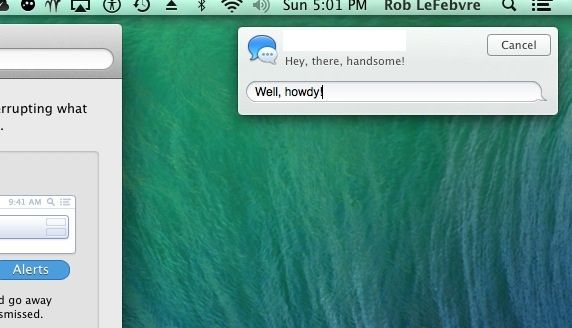
Did you know, however, that you can reply to iMessages sent to you in that very same Notification Center? If not, read on and learn how to do so, and how to make sure that your Mac is set up correctly to allow it to happen.
You’ll need to have your Messages app set up to get those iMessages in your Notification Center in the first place, so launch System Preferences from the dock or your Application folder, and then click on the Notification Center icon to go to that preference pane.
Once, there, click on Messages in the list of apps in the left-hand column, and make sure the checkbox is enabled for Show in Notification Center. You can choose to have either Alerts or Banners enabled, as they’ll both work for Replies.
Now, when you get an iMessage from someone, you’ll be able to reply to them from the notification. If you have them set up to come in as a Banner, you’ll need to hover over the banner itself to see the Reply button. If you’ve chosen to have Alerts, then you’ll see the Reply button underneath the Close button. Either way, hit the Reply button and type in your response. Your iMessage will go right back to the person who sent you the message in the first place.
Get Rid Of The Dashboard

The Dashboard has been getting less and less attention lately, and so it’s surprising that it’s still in OS X Mavericks beta, to be honest.
It does have a nicer background, to be sure, but if you’re feeling like it has outlived its purpose on your Mac, here’s how to get rid of it.
Launch Terminal from your Utilities folder, which is itself in the Applications Folder. Once launched, type or paste the following commands into the Terminal window.
defaults write com.apple.dashboard mcx-disabled -boolean true
Then remember to relaunch the Dashboard process, here:
killall Dock
Now the Dashboard will be gone, baby, gone, and you never have to think about widgets again.
If, however, you want to bring it back? Simple re-do the same commands above, only change the word true to false, and you’ll have it back in your heart lickety-split.
Via: iFans
Skip The Shell Script, Schedule Do Not Disturb Times
Back in OS X Mountain Lion, it took a seriously complex shell script and recurring Calendar event to schedule Do Not Disturb times. While it’s fun to dig in and mess about with scripts, I much rather like the new Mavericks beta ability to just, you know, schedule Do Not Disturb using a nice, pretty graphical user interface.
If you’re like me, and you want to schedule your Do Not Disturb times on your Mac (much the same way you can on iOS), then here’s what to do.
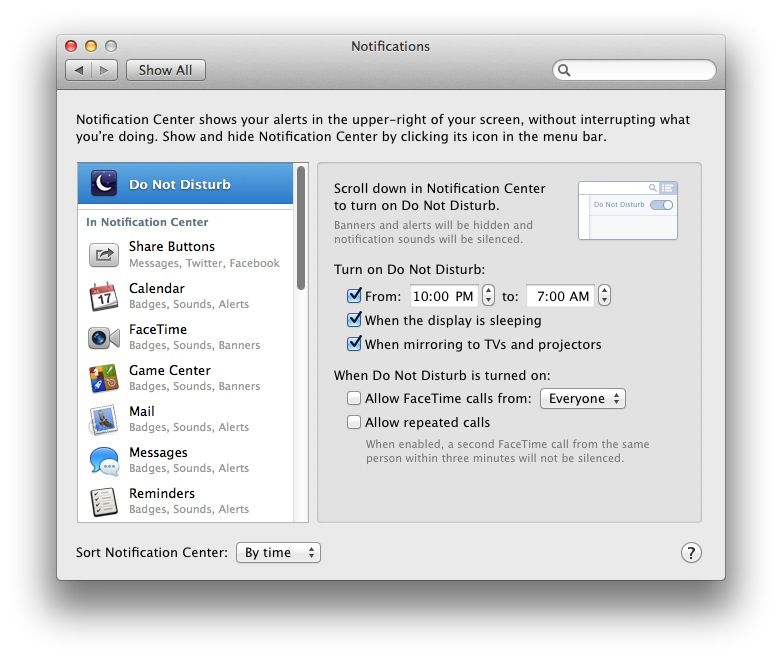
Launch System Preferences from the Dock or the Applications folder, and then click on the Notifications icon. Click on the Do Not Disturb icon in the left-hand column, and then you’ll see the options for this, including scheduling.
Click on the checkbox next to the From: field and either type in the time you want the Do Not Disturb feature to start. Then do the same in the to: field, only choose the time you want Do Not Disturb to stop working.
You can also choose to activate Do Not Disturb when the display is sleeping, or when mirroring to TVs and projectors, to keep any embarrassing iMessages from popping up during a presentation in front of hundreds of your co-workers.
Further down, you’ll see options to allow Facetime calls when Do Not Disturb is enabled, and you can allow them from Everyone, or just Favorite contacts. If you check the “Allow repeated calls” checkbox, then anyone who needs to Facetime you in an emergency simply needs to call back a second time.
Now you can keep from being distracted by the many notifications you get through Notification Center, and you don’t have to get all tech-geeky to do so. Hooray, OS X Mavericks!
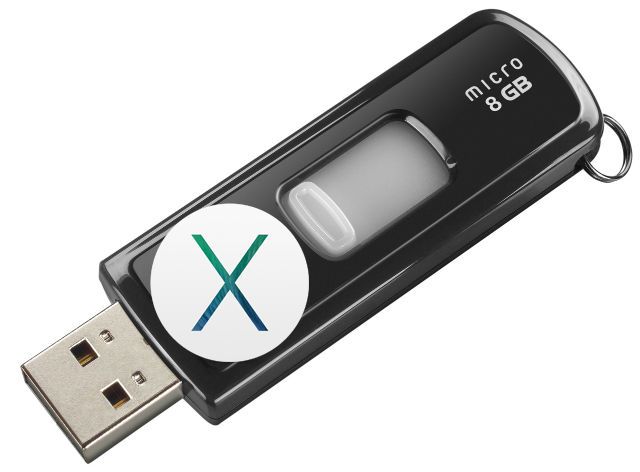
Boot Your Mac Into Mavericks Beta From A USB Drive
Are you a registered developer with Apple? Do you want to try out Mavericks without risking your entire Mac to a potentially wonky version of OS X? I haven’t seen any major issues, yet, but that doesn’t mean that mission critical softaware you rely on will work in Mavericks beta.
So, here’s the solution. Boot up from a USB stick that has been configured as a bootable OS X Mavericks drive. Here’s how.
The super smart folks at OS X Daily lay it all out, nice and simple. I’m using their stellar guide to inform this post, as there’s no reason to re-invent the wheel. Go give them a look; they’ve got some great stuff over there.
That said, let’s start in with getting Mavericks beta onto a USB drive. You’ll need at least an 8 G USB stick, or any other external hard drive that you can completely erase and use for this purpose. Also, make sure the Mac you’re using is new enough to run Mavericks beta, too. There’s a list on the Apple.com if you’re unsure.
Head over to the Apple Developer site, sign in with your Apple ID, and download a copy of OS X Mavericks beta. Don’t install it, though.
Connect your USB drive and then launch Disk Utility from the Utilities folder, which is in the Applications folder. Click on the USB drive on the left there, and click on the Partition tab. Select a single partition, and click the options menu to choose “GUID” as the partition type. Hit OK, and then click the Apply button.
Now, in order to see hidden files, issue the following command in Terminal, which you can launch from the Utilities folder, as well:
defaults write com.apple.Finder AppleShowAllFiles TRUE;\killall Finder;\say Files Revealed
Now you’ll want to find the OS X 10.9 Developer Preview app. It should be in the Applications folder. Right click (or Control-Click for you single-button mouse and trackpad users) and choose Show Package Contents from the resulting contextual menu. Open Contents, and then the SharedSupport folder.
You should see a self-mounting image called InstallESD.dmg; double click it to mount it like a regular disk. Open the now mounted disk (OS X Install ESD) image and right-click on BaseSystem.dmg. Choose Open to mount the image. If you don’t see it, you missed the step above to make hidden files visible.
Now drop back into Disk Utility and select BaseSystem.dmg from the left side, and click on the Restore tab. Set Source to BaseSystem.dmg, Destination to the USB drive (you can drag the USB drive icon into the box from the Finder, and then click the Restore button. Be sure to let it erase the drive with a quick confirmation button click.
WHen that process is done, head to the Finder and go to the newly made USB drive, and open System folder, then the Installation folder. Delete the file named Packages, and then leave the Finder window open.
Head back into the mounted OS X Install ESD drive and drag and drop the Packages folder from this disk to the Installation folder you just deleted the Packages alias from. Let stuff copy; it might take a few minutes.
Now the USB drive is ready to boot with. All you need to do is restart your Mac while holding the Option key down. When the list of available bootable drives appear, you should see your USB drive as an orange disk drive named OS X Base System 1. Click on it, and let it install from there.
Set Default Font Choices For Messages You Send And Receive
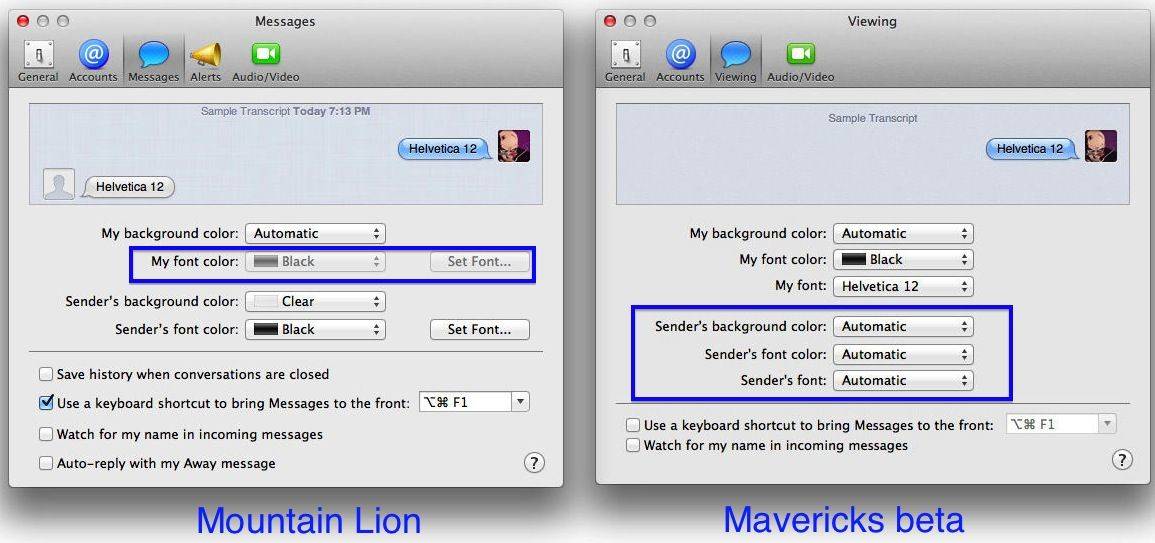
In the OS X 10.8 version of Messages on the Mac, you can set the background color of your own messages, and you can set the background color, font, and font color of anyone who sends you messages.
Now, though, in OS X Mavericks, you can do all those things, plus send messages in your own choice of font, as well as let your friends send you messages with their own font choices.
Here’s how to make that happen.
Launch Messages on the Mac you’re running OS X Mavericks beta on, and hit Command-Comma, or choose Preferences… from the Messages menu. Click on the Viewing tab at the top, or what used to be the Messages tab. The options in the View section look fairly similar, with a couple of subtle differences.
First, notice that you can now set your own font. Click on the My font popup menu and choose one of the three options there, or click on Other… to get the full font window.
Just below that, you’ll see the section for your friends’ font and message options. To see messages sent to you in the font, font color, and background color the sender intends, set the popup menu next to each option to Automatic. Now you’ll see what they mean you to see, though it’ll probably still be the default. Because who messes with these things, anyway, right? If you end up hating their font choices, then set them to something different here in these menus. Nice!
Pro tip – if you copy text from a document that has a specific font and style attached to it, pasting your text into Messages will now keep those format choices and send them along.